|
Size: 2212
Comment:
|
Size: 2741
Comment:
|
| Deletions are marked like this. | Additions are marked like this. |
| Line 2: | Line 2: |
{{{ NOTE: THERE HAS BEEN A CHANGE THE PROCEDURE BELOW! YOU NO LONGER NEED TO SETUP THE WHOLE SYSTEM SEE THE NEW DIRECTIONS }}} |
|
| Line 6: | Line 10: |
== New Instructions == First it is possible for you to use the old instructions, but the following procedure will make it easier. 1. Download the new script: 1. Using FileZilla or your favorite scp client and login to your server (use the Host=IP address, username=[name given in class] and port=22). 1. Upload the "nat" file you downloaded. (A real linux person would use wget or some such utility to get it directly from this site to your linux machine if you want try that instead ;-) 1. On your linux machine issue the command: {{{ chmod u+x nat }}} 1. Now run it {{{./nat -a [your ip address]}}} Your system is now setup! You can double check this by running {{{ ./list }}} which shows the configuration changes that we just made. Of course you can always just look at the script to see what it did ;-} === Troubleshooting === So you may have noticed that there is already a nat script on your server. Well it does an extra thing that will cause trouble. If you ran that script you need to edit /etc/network/interfaces and remove the duplicate eth1 information. == Old Instructions == |
|
| Line 22: | Line 46: |
| NOTE: ALL OF THIS CAN BE FOUND BY TYPE "man iptables" from the command line in linux. == Connecting to Samuel and dealing with Certificate Errors == 1. Download the certificate files listed below 1. On your windows machine, run mmc.exe '''as administrator'''. (this was our problem in class) 1. File, Add/Remove Snap-ins 1. Select Certificates and click ADD. Select Computer Account, and click finish. 1. Click Ok. 1. Expand Certificates and right click on Trusted Root Certificate Authority, Select All Tasks, Import 1. Walk through the wizard importing the certificates you downloaded. (Make sure they are being put in the Trusted Root Certificate Authority folder). === Certificates === * [[attachment:vmhost01_CA.cer]] * [[attachment:vmhost02_CA.cer]] * [[attachment:vmhost04_CA.cer]] |
NOTE: ALL OF THIS CAN BE FOUND BY TYPING "man iptables" from the command line in linux. |
Virtual Network Configuration
NOTE: THERE HAS BEEN A CHANGE THE PROCEDURE BELOW! YOU NO LONGER NEED TO SETUP THE WHOLE SYSTEM SEE THE NEW DIRECTIONS
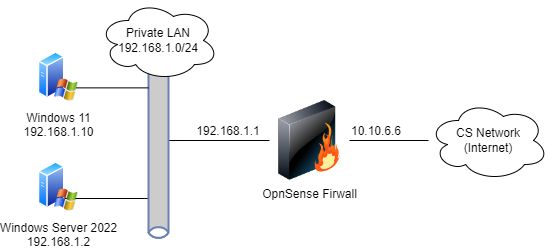
Below is a diagram that shows how your virtual network sees the world and how the world sees it. We have eliminated for the moment the complications of the <<latex($\mu$)>>Cloud. The IP address 216.249.119.123 is a place holder for your IP address.

== New Instructions ==
First it is possible for you to use the old instructions, but the following procedure will make it easier.
- Download the new script:
Using FileZilla or your favorite scp client and login to your server (use the Host=IP address, username=[name given in class] and port=22).
Upload the "nat" file you downloaded. (A real linux person would use wget or some such utility to get it directly from this site to your linux machine if you want try that instead

On your linux machine issue the command: chmod u+x nat
Now run it ./nat -a [your ip address]
Your system is now setup! You can double check this by running ./list which shows the configuration changes that we just made. Of course you can always just look at the script to see what it did ;-}
Troubleshooting
So you may have noticed that there is already a nat script on your server. Well it does an extra thing that will cause trouble. If you ran that script you need to edit /etc/network/interfaces and remove the duplicate eth1 information.
Old Instructions
In order for you to do port forwarding for your server, you must setup the iptable rules. We need two pieces of functionality:
- NAT
Port forwarding 3389 -> 192.168.1.2:3389 and 3390 --> 192.168.1.3:3389
To setup NAT on Ubuntu, see Ubuntu NAT. We'll add a short bit of instructions to the system to forward the ports as follows:
#Port Forwarding Stuff:
iptables -t nat -A PREROUTING -i eth0 -p tcp -d 216.249.119.[your ip] --sport 1024:65535 --dport 3389 -j DNAT --to-destination 192.168.1.2
iptables -t nat -A PREROUTING -i eth1 -p tcp -d 216.249.119.[your ip] --sport 1024:65535 --dport 3389 -j DNAT --to-destination 192.168.1.2
iptables -t nat -A PREROUTING -i eth0 -p tcp -d 216.249.119.[your ip] --sport 1024:65535 --dport 3390 -j DNAT --to-destination 192.168.1.3:3389
iptables -t nat -A PREROUTING -i eth1 -p tcp -d 216.249.119.[your ip] --sport 1024:65535 --dport 3390 -j DNAT --to-destination 192.168.1.3:3389
NOTE: ALL OF THIS CAN BE FOUND BY TYPING "man iptables" from the command line in linux.
